Sunday, February 1, 2015

Lietuvaitė

O vaje vaje, jau tiek laiko praėjo nuo mano paskutinio įrašo šiame bloge. Net negaliu patikėti, kad laikas bėga taip negailestingai. Praėjo tiek metų, kol susiradau savo seną kampelį, kuriame dalinausi savo kūrybiniais atradimais, nors ne kažin kiek jų buvo, bet buvo malonu pasidalinti savo darbelių nuotraukomis. O dabar kaip tik sugrįžau, nes reikėjo prisiminti, kaip padariau atviruką su automobiliu savo draugui. Jis ir dabar dar laiko šį atviruką- jaučia, kad daug širdies įdėta į atviruko sukūrimą.
Ne tik atviruko nuotrauka norėčiau pasidalinti, bet ir savo paskutiniu projektu- lietuvišku tautiniu kostiumu, kuris gimė iš idėjos papuošti savo anūkytę Karolytę.
Štai mano mažasis modelis.

I can't believe so much time passed since I wrote my last post on my blog. It was a nice place to share my photos, my leather jewelry and Kirigami cards.  I hope to post more of my new creations on this blog and have more followers on my blog. Here is my last sewing project- Lithuanian national costume presented by my little granddaughter Caroline.

Monday, November 14, 2011

KIRIGAMI ARCHITECTURE

   Would you like to visit the other countries and see the most beautiful architectural monuments?
 It's easy to do without leaving your room or worrying about plane tickets and hotel rooms. All you need to do is to buy a sheet of thick paper, X-acto knife and search for Kirigami patterns on internet. Some patience and effort will give you a beautiful architectural building- London Bridge, White House or Sagrada Familia masterpiece in a heart of Spain. These are some of my buildings I "visited" without leaving my room.
They are always with me, they give me inspiration to look for new ideas, they can be the beautiful gifts for my friends.


Ar norėtumėte aplankyti kitas šalis ir pamatyti pasaulio gražiausius architektūros paminklus? Tai  nesunku padaryti neišeinant iš savo namų, nesirūpinant lėktuvų bilietais ar viešbučių kambarių užsakymais. Tereikia įsigyti storo popieriaus lapą, x-acto  peilį ir internete paieškoti Kirigami iškarpų. Truputis kantrybės ir jau turite savo namuose Londono tiltą, Baltuosius Rūmus, Ispanijos širdyje stovintį nuostabų Sagrada Familia šedevrą. Štai keletas architektūrinių pastatų, kuriuos aš "aplankiau" neišeidama iš savo kambario. Jie visada su manimi, jie įkvepia mane ieškoti vis naujų idėjų, jie tampa gražia dovana draugui.


My new passion

Here are my new passion objects- leather jewelry. I know it's not a paper, but after skiving a piece of leather it becomes as thin as a PAPER. So here are my creations of leather jewelry- necklaces, bracelets, earrings, and pins. I hope you'll like them as much as I love making them.


Friday, February 11, 2011

Valentine's Day Card


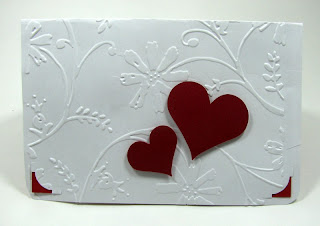
Artėja Valentino diena, kai norime pasveikinti savo mylimus žmones. Gal norite pradžiuginti juos savo padarytu atviruku? Štai viena idėja. Atvertus atviruką, į priekį iššoka širdelė su gėlyte. Jei nenorite, galite gėlytės nepjaustyti, o tiesiog iškirpti dar vieną širdelę ir ją ant viršaus užklijuoti ar tiesiog nuspalvinti.
Projektui reikės: aštraus peiliuko, storo kartono ar keleto sluoksių popieriaus, ant kurio pasidėsite atviruką, kad neperpjautumėte stalo paviršiaus, liniuotės, klijų, raudono ir balto popieriaus. Aš baltą atviruko pagrindą padariau faktūrinį su Cuttlebug faktūriniais padėkliukais, o 2 1/2", 1 1/4 " ir 3/4" dydžio širdeles išpjoviau su Cricut Flantin SchoolBook komplektu.
Jei norite išpjaustyti širdelę pasinaudodamos mano sukurtu piešiniu, atsiųskite man savo elektroninio pašto adresą ir aš Jums pasiųsiu piešinuką. Jei norite pačios išsikirpti širdelę, tai visai lengva padaryti.
Nupieškite širdelę, tačiau apčioje padarykite širdelę plokščią, nes šioje vietoje ji laikysis prie atviruko pagrindo. Nuo širdelės viršaus padarykite tokias " petnešėles", kurios irgi laikys širdelę. " Petnešėlių" ilgis ir atviruko lenkimo linijos atstumas nuo pagrindo turi būti vienodas- šie atstumai pažymėti raide A. Aštriu peiliuku išpjaukite širdelę, tuomet išnaudotu tušinuku ( be rašalo), įbrėžkite punktyrines linijas ir per jas lenkite taip, kad širdelė pasistumtų į priekį. Teisingai sulankstyta širdelė tvarkingai suguls į plokščią atvirutę. Sulankstytą širdelę  iš blogosios pusės patepkite klijais tik aplink atvirutės kraštus- būkit atsargūs ir nepatepkite klijais pačios širdelės, po to priklijuokite prie pagrindo ir padekoruokite atvirutės priekinę dalį. Telieka ušrašyti palinkėjimus ir pasiųsti mielam žmogui.
Gražios Valentino dienos.


Only few days left until Valentine's Day. Do you want to send a hand made Valentine's Card to someone so special? Here is an idea. Make your own Valentine's Card. You need a card file or your own heart picture- it is important to have the same distance ( marked A in the picture) from heart base to the folding line and from heart top to folding lines, x-acto knife, self healing pad, white and red paper, glue and a ruler.
Print a file and cut all continuous lines. Using an old pen ( no ink) score dotted and dashed lines. Start folding at a dashed line in the middle- here will be your card's folding line then fold at the bottom of a heart and on top of the heart. Gently fold these parts of the card pushing forward until it would drop flat.
Make a backing of the card, score to insert your heart or glue it on.
Decorate a front of the card. I used a Cuttlebug embossing plates to emboss one side of the card and Cricut cutout hearts 2 1/2", 1 1/4 " and 3/4" hearts from Flantin School Book set.
Happy Valentine's Day!

Monday, January 10, 2011

Kirigami

Šiandien įdedu keletą savo išpjautų Kirigami darbų. Kirigami japonų kalbos žodis - "kiru" reiškia pjauti, o "gami"- popierius. Kirigami  nuo Origami skiriasi tuo, kad Kirigami darbuose, skirtingai nuo Origami, popierius pjaunamas, tada lankstoma figūra, priklijuojamas pagrindas.
JAV pirmoji šį žodį panaudojo Florence Temko savo knygoje "Kirigami, the Creative Art of Papercutting" ir nuo tada šis terminas popieriaus karpymo metodui prigijo ir plačiai vartojamas.
Mano Kirigami darbų įkvėpėja yra Ingrid Siliakus http://ingrid-siliakus.exto.org/ . Tai menininkė, kurios nuostabūs darbai įkvėpė ne vieną pasekėją išbandyti rankos tvirtumą, kantrybę ir pabandyti sukurti jei ne tokius sudėtingus, tai bent jau paprastesnius darbelius.


Jos ir kitų dviejų menininkių Joyce Aysta ir Maria Victoria Garrido Bianchini išleistoje knygoje The Paper Architect yra pateikiama ne tik pastatų istorija, fotografijos, bet ir duotos iškarpos, pagal kurias esu išpjovusi nemažai darbų. Galima ir internete surasti Kirigami darbų iškarpų, o pjovimas ir lankstymas yra visai nesudėtingas.

Today I'm posting a few Kirigami cards. In the United States, the term "kirigami" was coined by Florence Temko. She used the word kirigami in the title of her book, Kirigami, the Creative Art of Papercutting, 1962. The book was so successful that the word kirigami was accepted as the name for the art of paper cutting.
In Japan, the word kirigami had been in use for a long time because "kiru” means to cut, and “gami” means paper. So, kirigami means to cut paper. First you print a pattern, then cut lines, score the dotted lines and fold. 
My works started after I discovered an amazing artist Ingrid Siliakus http://ingrid-siliakus.exto.org/ .
I started with the simple cards which led to more complicated works. I used patterns from the book The Paper Architect written by three talented artists Ingrid Siliakus, Joyce Aysta and Maria Victoria Garrido Bianchini. So here are my Kirigami cards.

Wednesday, December 8, 2010

Santa is Coming to Town

Šiandien padariau draugei atviruką- reikėjo jį padaryti tokį, kad galėčiau kartu įdėti ir mažutę dovanėlę nuo Kalėdų Senelio. 
Iškarpos Kalėdų Senelio rogių, stalčiuko, į kurį įdedama dovanėlė ir dovanos padarytos SVG formate.
Kokia eilės tvarka padarytas visas atvirukas, parašyta angliškame variante. Manau, kad nesunku suprasti visus atviruko padarymo etapus. O jei turite komentarų ar klausimų, galite parašyti i Comments ir aš pasistengsiu atsakyti.
                               
I made a greeting card for my dear friend- the card has a secret compartment to hide a "Present from Santa".
I came up with the idea to make greeting card with Santa's Sleigh and put a secret drawer under it. I made a SVG file to cut a sleigh and drawer using a Cricut. So if you want to cut different size both shapes will come out adjusted.
Then I made presents using Cricut, folded and glued on the Sleigh. The rest of used supplies is below.
I hope you enjoy my greeting card and maybe you will make one yourself.


To make a Santa's Sleigh greeting card use file to cut out a Santa's Sleigh (SVG).
Card stock 11"x 6" and scored at 5.5" plaid red ( Momenta card stock)
Card stock green 5 1/2" x 4 3/4" textured using Sizzix
Snow- use Glossy Accents  and Dazzling Diamonds
Ribbon Red 18-20"
Embroidery floss
Santa is coming to town- file
Snowflakes - file.
1. Cut out Santa's Sleigh using Cricut ( when using red paper for a sleigh align next to it black paper for a sleigh base so your Cricut will cut both details at the same time.
2. Glue a sleigh and a base together.
3 . Cut out sleigh's drawer, glue and insert into sleigh. File
4. Cut out presents using a Present file. Use different colors of paper ( best is to use designer's paper) and glue it together. Use embroidery floss to tie a knots on the presents.
5. Glue the presents onto a sleigh.
6. Texture the green card stock.
7. Tie the ribbon.
8.Glue green card stock to the red plaid base.
9. Glue the sleigh to the green card stock.
10. Use Glossy Accents around the sleigh. Drizzle the Dazzling Diamonds. Let it dry.
11. Punch out sentence " Santa is coming to town" and glue to the card.
12 . Use Glossy Accents to glue some Dazzling Diamonds on the snowflakes  and glue snowflakes using 3D dots on the card.

13.The card we put into a box.
The box is cut out of red plaid card stock- the same we used for a card base. Start with a 11 1/8" by 10 5/8" sheet of paper. We score 2 4/8", 8 5/8" then turn 90 degrees left and score 2 4/8 and 8 1/8". Make cuts to first folding line and score to form a box. Put some glue on the flaps and glue that the flaps go inside of the box.
The lid is made by the same size of paper, but this time we need to move paper 1/16" right from the 0 mark of the ruler, then make a score at 2 4/8", then move paper back to the left to reach 0 mark of the ruler, then score at 8 5/8" mark. Then turn the paper 90 degree to the left and line the paper to 1/16 " mark, score at 2 4/8" mark, then move the paper back to the 0 mark of the ruler and score again at 8 1/8 ". Make cuts to the first folding line. Now it's time to decorate your box lid. After your box lid is decorated put a glue on the flaps and glue it together. This box is accommodated to keep your Santa's Sleigh card.